POBox Plusで少しでも楽に記号を打つために


ユーザー辞書を使ってみます。


「読み」に極力変換候補の少ないものを選びます。
今回使うのは、スペースキーの左隣にある「コンマ」。これは変換候補が「全角コンマ」「半角コンマ」の2つしかありません。


# 、 % 、 & 、 -(半角ハイフン) 、()(半角カッコ両方) 、 /(半角スラッシュ) 、 >(半角不等号)などを登録しました。


あとは入力時に変換するだけ。元となる「コンマ」の候補が少ないので、記号が後ろに回っても選びやすいかと思います。


が、やはり根本的な解決には程遠い。
QWERTY最上段に記号が置けてた頃は英字を打ちながら"確定させずに"記号も一緒に打てたけど、この方法ではそれができません。
未確定文字がある時にコンマを入力した時に、ワンタップで"コンマだけ"変換することはできないですからネ。

そんな感じ。

【Xposed】今使ってるXposedモジュール一覧 2014_06_01

備忘録も兼ねてます。
アルファベット順です。


All Notifications Expanded
 └リポジトリはこちら

必須。もはやこの状態がデフォルトだと思ってます。


Burnt Toast
 └リポジトリはこちら

トーストメッセージが表示された時、そのメッセージがどのアプリからのものかを示してくれる。


Complete Action Plus
 └リポジトリはこちら
 └Google Playはこちら

アプリの選択肢や共有メニューをカスタマイズ。位置変更、透過、テキストサイズやグリッドカラム数も調整できるのが良い。


GravityBox(JB)
 └リポジトリはこちら

UIカスタム、電源メニューに「再起動」追加、通知領域背景透過、ナビバー非表示(拡張デスクトップ)、ナビリング拡張(5個まで)、画面消灯効果変更(CRTがお気に入り)などなど。


Greenify
 └Google Playはこちら
 └Donation Packageはこちら

ドネ済。アプリの冬眠を担当。


Master Key multi-fix
 └リポジトリはこちら

入れっぱなし。


Play Store Link in App info
 └リポジトリはこちら

「設定」→「アプリ」からアプリを選んだ先(詳細画面)に、そのアプリのGoogle Playページにジャンプできるボタンを設置。
今はもうGravityの拡張デスクトップモードでいつでもナビバー出せるからいいけど、FullScreen Toggleなどを使ってナビバー消してた頃はLMT・UDNなどの代替ナビバーアプリが急に止まった時の最終手段として活躍。


Screenshot Delay Remover
 └リポジトリはこちら

スクショ撮影時のタイムラグを減らす。ほぼ100%1秒以内に撮れるんで重宝しています。


SemcPhone Patcher
 └リポジトリはこちら

モバイルデータ有効化/無効化時の注意書きポップアップの停止。通話録音は別のアプリを使ってます。


Smootgh System ProgressBars
 └リポジトリはこちら

必須。もはやこれがデフォルトだとry
プログレスバーの表示をなめらかにする。


SwipeBack
 └リポジトリはこちら

スワイプでバックキーの効果。UIを丸ごとスライドさせるのが好き。
現在は別の代替ナビバーアプリを使っているため停止中。
たまにバックではなくアプリ終了しちゃうけどそれも使い方次第では楽だし、動きはこれが一番好き。


Xperia QuickSettings LongClick
 └リポジトリはこちら ※「Xperia QuickSettings touch-and-hold」へのリンクです。

必須。もはやこれがry
通知領域の上に置かれたトグルを長押しするとその項目の設定画面が開く。
このモジュールのせいでKitKatから採用されるQuickSettingsパネル絶対拒否反応出ると思う…。


今入っているのはこれだけです。
ニワトリさんは……LMTのポインター派なので(汗
何か面白いモジュールがあったら教えてくださいm(_ _)m

そんな感じ。

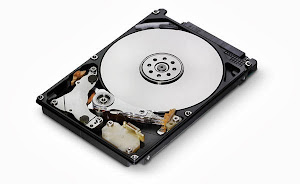
Why A Hard Drive Or Pen Drive Has Less Storage Space Than Promised?

It has happened to most of us. We buy a new hard drive (or maybe a flash drive) with mind boggling storage capacity only to find that it has less space than what was mentioned on the box. Angered, we start cursing the manufacturer and our dealer for false marketing thinking that they should be sued for doing this. Hey, but have you ever wondered how they continue to do this again and again without getting into legal trouble?


The answer is that they are not marketing it falsely at all. Surprised? I'll explain.
hard drive

A manufacturer considers 1 Megabyte to be 1000 Kilobytes, 1 Gigabyte to be 1000 Megabytes, 1 Terabyte to be 1000 Gigabytes and so on. This is correct considering that kilo means 1000 and mega means 1000000 (10^6). However, computers calculate on base 2 and to them, 1 MB is actually 1024 kilobytes, 1GB is 1024MB and 1 TB is 1024GB. This difference in the method of computation is responsible for this "missing space."

Lets take an example of a 500 GB hard disk. 

From a manufacturer's point of view, the 500GB will have 500*1000*1000*1000 = 500000000000 bytes.

From a computer's point of view, 500GB is actually 500*1024*1024*1024 = 536870912000 bytes.

So, a hard drive that promises to have 500 GB storage space will actually display 465.66GB, 536870912000-500000000000 = 36870912000 bytes (34.34GB) less storage space when connected to a computer.

Space PromisedDisplayed on a computerDifference
100GB93.13GB6.87GB
250GB232.83GB17.17GB
500GB465.66GB34.34GB
1TB931.32GB92.68GB
2TB1862.64GB185.36GB

Take a look at the table given above to see how much space is "lost" due to computers working on a base 2 system. As you can see, with the increase in capacity of the storage device, there is an increase in the missing space.


Change Your Pen Drive Icon


Does your Pen drive have a boring, generic icon that you would like to change? Do you want the new icon to
show on whatever computer you use, so registry editing is not an option? Using an Autorun file is your
solution.
Follow these steps..
1. Go to Notepad (Start --> All Programs --> Accessories --> Notepad).
2. Type the following code:
[Autorun]
icon=youricon.ico
Where youricon.ico is the name of the icon file.
3. Go to File --> Save As --> Name it autorun.inf and save it in ur Pen Drive. (For me, it's F:\).
4. Now all you need is an Icon. Icons can be downloaded off the internet but if you have a picture you want to
convert into an Icon (.ico), there are plenty of programs to do so.
I use ImageToIcon.
5. When you get your Icon, move it to ur Pen Drive along with the Autorun file.
6. Unplug the drive and plug it back in and you should be able to see your custom icon.
(If unplugging the drive doesn't work, try restarting the computer).
ENJOYYYYY........

How to Check if your PC can Run the Latest Games

Every PC gamer wants to run the latest and the newest game on his/her PC. Now if you play all the latest games on your normal laptop then you should know whether your Laptop/PC can run the game that you are willing to buy.
If you use Gaming laptop or Gaming PC equipped with top-notch hardware then you can play almost every new or latest game on it, with maximum of setting. But if you play your games on low-end PC or Laptop with lower graphic memory then we ask this question frequently  “Can My PC Run this Game”?
Most of the time  PC games come with hardware and software requirements, so just look at the requirements and your system configuration to check whether your system can run the  game.  Alternatively, here we have the best solution for your question. Here we will use an online utility which will scan your PC or Laptop and will let you know whether your PC can run the game or its time to upgrade.

How to check if your Windows PC can Run the Latest Games

The online tool we are using here is SystemRequirementLabs. This tool works on all version of Windows, including Windows 8.
Follow below steps to check if you can play the latest games on your PC.
Step 2: Now click ”Select a Game from the list” and type any game name you want to check
Step 3: Select your game from the list and click on “Can You Run It
Note:  you need to have Java Installed, if you don’t have Java Installed then you’ll be asked to download and install it on your PC.  After installing JAVA proceed with step 4.

Step 4:   In the next Window, click Begin Detection from Automatic Detection
Step 5: Waite for few seconds until it analyzes your PC’s hardware
Step 6: After finishing the analyzing process, you can see whether your PC is capable of playing that game or not.
That’s it! By following the above steps you can check whether your PC can run the latest games or not. Do let us know your views in the comments.

Watch Dogs Benchmarked: Graphics & CPU Performance

Set in an alternate reality techno-dystopian Chicago, Watch Dogs hit every gamer's holiday wishlist after appearing at E3 2012. The open world hackfest wowed onlookers with its urban stealth action and its seemingly 'next-gen' graphics. Unfortunately, a month before its November 2013 release the game was delayed for another six months -- the short-term blowout of which caused Ubisoft's stock to drop some 40%.


Being a long-term company with a long-term vision, Ubisoft says Watch Dogs is a long-term play and so it was postponed because it simply wasn't ready. That's commendable considering how often games are released in an unfinished state just to meet deadlines and make sales. Battlefield 4, for example, was among the buggiest blockbusters to ship in recent memory yet it grossed well over $200 million dollars last year.
Making a bad first impression wouldn't have been the smartest way to begin a new franchise, especially when the alternative is having fans wait two quarters. However, with that extra development time and nearly two years having passed since the game was unveiled, many people are wondering if Watch Dogs can live up to the hype.
Developed by Ubisoft Montreal, the same group behind Assassins Creed, Watch Dogs has been built by the studio's new 'Disrupt' engine, which was mostly constructed from scratch but includes parts of AnvilNext and Dunia, two Ubisoft engines used in the Assassin's Creed series as well as Far Cry 2 and 3. Specifically, Disrupt's open world city management comes from AnvilNext while its vegetation and AI are from Dunia.
There was a lot of controversy surrounding Watch Dog's graphics approaching its launch but it appears to have been based on a few videos, not firsthand gameplay. Some gamers believe Watch Dogs looked better back in the 2012 E3 trailer versus more recent gameplay trailers or the graphics seen in the beta, but the former used console gameplay instead of PC and the latter was downgraded to reduce the size of the download.


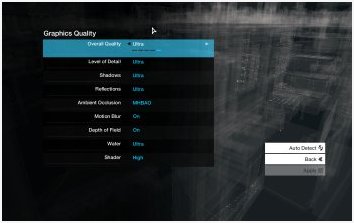
Whatever the case is or was, the game looks amazing when set to ultra on the PC. The visuals are spectacular and I found myself often being drawn away from the gameplay to admire how great it all looked. Before we dive in, it's worth noting that we're also taking this opportunity to look at the latest round of R9 200 series cards from HIS, which are factory-overclocked and outfitted with the company's custom coolers.

Testing Methodology

For testing, we settled at the first save point once Aiden Pearce reaches his hide out and takes a well-deserved nap. Wakened from his slumber, he surveys the area around the hideout for criminals. We started the benchmark when we opened the door to leave.
The first half of the benchmark is a rendered scene where the perimeter of the hideout is viewed from fixed cameras and then we take a 45-second walk before the test ends at 90 seconds.
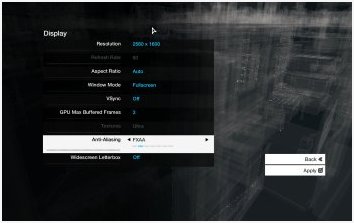
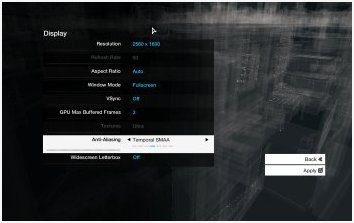
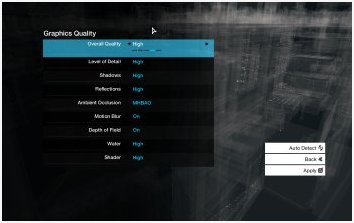
We used Fraps to record the average frame rate and the game was tested at three resolutions (1680x1050, 1920x1200 and 2560x1600) and two quality settings (Ultra with Temporal SMAA and High with FXAA) across 31 different graphics cards and 20 processors. The latest AMD and Nvidia GPU drivers were used in all tests.

Test System Specs

  • Intel Core i7-4770K (3.50GHz)
  • x2 4GB Crucial DDR3-2400 (CAS 11-13-13-28)
  • Asrock Z97 Extreme6 (Intel Z97)
  • Silverstone Strider Series (700w)
  • HIS R9 290X iPower IceQ X² Turbo 4GB
  • Gigabyte Radeon HD 290X (4096MB)
  • HIS R9 290 iPower IceQ X² OC 4GB
  • Gigabyte Radeon HD 290 (4096MB)
  • HIS Radeon HD 7990 (6144MB)
  • HIS Radeon HD 7970 GHz (3072MB) Crossfire
  • HIS R9 280 IceQ X² OC 3GB
  • HIS Radeon HD 280X (3072MB)
  • HIS R7 260X iCooler 2GB
  • HIS R7 250X iCooler 1GB
  • HIS Radeon HD 7970 GHz (3072MB)
  • HIS Radeon HD 7970 (3072MB)
  • HIS Radeon HD 7950 Boost (3072MB)
  • HIS Radeon HD 7950 (3072MB)
  • HIS Radeon HD 7870 (2048MB)
  • HIS Radeon HD 7850 (2048MB)
  • HIS Radeon HD 7770 (1024MB)
  • HIS Radeon HD 6970 (2048MB)
  • Gigabyte GeForce GTX Titan (6144MB)
  • Palit GeForce GTX 780 Ti JetStream (3072MB)
  • Gigabyte GeForce GTX 780 Ti (3072MB)
  • Gainward GeForce GTX 780 (3072MB)
  • Gainward GeForce GTX 770 (2048MB)
  • Gainward GeForce GTX 690 (4096MB)
  • Gainward GeForce GTX 680 (2048MB)
  • Gigabyte GeForce GTX 660 Ti (2048MB)
  • Gigabyte GeForce GTX 660 (2048MB)
  • Gigabyte GeForce GTX 650 Ti (2048MB)
  • Gigabyte GeForce GTX 580 (1536MB)
  • Gigabyte GeForce GTX 560 Ti (1024MB)
  • Gigabyte GeForce GTX 480 (1536MB)
  • Microsoft Windows 8.1 Pro 64-bit
  • Nvidia GeForce 337.50
  • AMD Catalyst 14.4

【Xposed】MinMinGuard開発再開のため(?)NyanNyanGuardが更新を停止

MinMinGuard | Xposed Module Repository

NyanNyanGuard 更新停止のお知らせ AndroPlus Blog

日本向けhostsはすでにMinMinGuardに統合されているとのことです。

MinMinのほう更新日今日(5月31日)になってますね。
NyanNyan使ってた方は(一応バックアップしつつ)MinMinに戻したほうがいいかもしれません。


これに合わせて、すっかり忘れていたずっと様子見してたXposed Framework v2.6.1をようやく入れました。
「フレームワーク」項目の「インストール方法」の「クラシック(/systemに直接書き込む)」を選んで、下の方の「アプリ」から「テーマ」を「ダーク」にしないと文字が読めない(黒背景に濃い灰色の文字)ようになっててちょっと焦った。
※「設定」の中にもあります。


確かに1.7.4になってますね。
Repoにもあったけど、XDAの一番上に「Cancelled」とは書いてある……スレの末尾も読んだけどよくわからず。
※後日追記
G+でコメントをいただきました。「Cancelled」表記が消えたのはリポジトリとGitHubだそうです。


てか2.6.1なかなか面白いことになってますね。
ちょっといじくりまわしてみようかな。

そんな感じ。

Chromecastに唯一足りない機能

Chromecastについてはこちら


これ。
※このSSは「dStickリモコン」アプリのものでChromecastとは関係ありません。

どういうことかというと、ドコモのdStickにはスマホからdStickの接続先TVの画面をコントロールするトラックパッド、スクロールバーなどがあるんです。
これを使ってdStickで表示したdビデオ画面をマウスカーソルでもって操作できるんですが、Chromecastはこれができません。

Google CastでPC版Chromeのタブをミラーリングした後でスマホなどからミラーリング先のタブでクリック操作を行えれば間違いなく最強。
いちいちタブを開き直さずにYouTubeやニコ動で複数の動画が見れるようになるからネ。

もう1つ、願わくばAllCastやSolidExplorerCastPluginのように、PCのローカルコンテンツもキャストできるようにしてほしい。
毎回DLNA介するのもめんd……いやこれはただのワガママか(´・ω・`;)


でも今のところChromecastは超便利だと感じています。
TVでニコ動の作業用BGMをループ再生したり、dビデオ再生しながらPCでフルスクリーンゲームとかもできたし。
HDMIケーブル使ってPCを2画面にすると、片方でフルスクリーン化した時にもう一方も消えちゃうのが難点でした。ここが解消できただけでもかなり◎。

余談ながら昨日の出掛けにポスト見たらChromecast入ってたんでそのままオクトバに持ってってレビューしたんですが、その途中でオクトバ宛にChromecastが届いてびびった。社長が買ってたらしい……(´;ω;`)SmartWatchの時といいNexus5の時といい、経費で買ってくれるのはすごく有難いです。
今回は自分でも使いたいから買っちゃったけど、Nexus5とかだとMNPまで考えなきゃならないし(白ロムという選択肢は最初からない)、個人じゃきっついですからネ。


そんな感じ。

Easily Speed Up Chrome On Your Android Device With This Simple Trick


Web browsing is undoubtedly one of the most used features of smartphones, and if you use an Android device there’s a good chance that you use Google Chrome for all your web needs. But anyone who extensively uses the app will know that over time the app can really slow down, especially if all your open tabs contain plenty of images or are otherwise content-heavy. This should not happen if you’re using one of those top-of-the-range Android smartphones, but alas, it sometimes does.


A recent discovery by one Reddit user has pointed out that no matter how much memory your smartphone has free, Chrome, by default, can only access 128MB of that memory. And while that’s absolutely fine if you just want to open a few simple text pages, its not enough if you’re doing something that requires more memory. Thankfully, unlike iOS, Android is really lenient with customization, and this limitation is an easy one to bypass.

You can easily speed up Chrome by simply opening up a new tab and entering the following string:

chrome://flags/#max-tiles-for-interest-area


After you press Enter on your Android keyboard, you’ll be presented with a menu that will allow you to change the amount of memory Google Chrome can access. Here’s the menu you’ll be looking for:


When you click on “Default,” you’ll be presented with a pop-up window similar to the one below:


We suggest changing this memory value to something a little more, with 256 or 512 being the right direction.

You should now have a much smoother, faster and better experience while browsing the web using the app. Also, you’ll notice that scrolling will now be much more smoother. Simple, right?

Did you use this tip? Tell us what you thought of it in the comments below.

【root】LMTのISASをもっと便利に使えるようなスワイプナビアクションアプリ【非root】

Navigation Layer - Google Play の Android アプリ


Gestures glowを隠さないとうっすら白く見えます。
左右端と下端にスワイプ起点が置けます。


エリアの大きさは調整可能。SwipeBackを下に置いてたので、僕はそこをメインにしてます。
**ROOT**ってついてないほうの「Go Back」を使うにはユーザー補助を有効にします。


アプリ起動とかも追加できますが、ナビキーアクションはこのように設定してみました。
端であればどこでもいいので、左下の端を上にスワイプしてもバックになります。

そんな感じ。


POBox Plus 使ってみて良かったところ・悪かったところ

【号外】154氏、Xperia Z2からPOBox Plusを移植 - トムとロイド

このバージョン(17.1.B.0.318)です。


4.3はともかく4.2を完全に飛び越しているため実感が沸かなかったんですが、GX(with CM11)って4.4.2なんですよね…。
テーマ適用できました。


記号の入力の仕方がいいと思った。短押しで変換候補が表示、長押しで拡張した状態で表示。
グループごとに纏まってるのもGood!
ただやっぱQWERTYの最上段に最低限の記号がほしい……。

http://
()
@gmail.com
#Xperia

など、よく使う記号は多い。ユーザー辞書か定型文使うか…。


たぶん前からあったんだろうけど、自動スペース入力を最近知って便利に使ってます。
自動大文字はいらないかな…。


変換候補にタブがついたのも良い。いろんな候補がごちゃまぜになって探すのが面倒だったし。
あとこの真ん中の「変換」タブ、入力ミス補正無視して直変してくれるのかな?だとしたらGood!
カナ変換も地味に便利。


直変で顔文字が出てくるのも良いネ。ユーザー辞書使って種類増やしてもここに出るかな?


反対に個人的にもったいないと思った部分としては、

①キーボードのサイズに融通がきかなくなった
 ※最下部を5ミリくらい浮かせて使いたい…LMTとかSwipeBackとか…。
 ※どちらかに寄せるのはいいけど、端をちょっと離したい。ただでさえ端末デカイから指伸ばすと腹で画面触っちゃう。

②多機能なのはいいけどどれも一手間かかる
 ※もっと長押しとか文字種変換キーにもスワイプをあてるとかしてほしかった。

③プラグイン呼び出しボタンがなくなった
 ※前はケータイ入力時のみ音声入力キー長押しでできた。
 ※メニュー開くと一番下にある。プラグインは即座に呼び出したいのと、マッシュルームパックみたいに複数セットになったものが(例えアプリ側で非表示にしても)全部表示されてしまい不便。
 ※並び順も変更できないのかな?特に「Webからアプリ追加」ボタンってどう考えても末尾に置くべきかと。

④ツールバーがカスタムできない
 ※せっかく追加されたのに…。
 ※左手使いとしてはツールバーのメニューボタンを一番左に持っていきたい。
 ※ここにプラグイン登録できたら最強。

⑤記号キーのカスタムができない
 ※全て候補欄に出るためだと思うけど、前みたいにQWERTYを切り替えるタイプにして並べ替えをしたい

⑥英数と記号を続けて打つことが難しくなった
 ※コンマ、ドット、アットマークのみ可能。
 ※メアド入力時など、途中でドットなどを打った時に入力が確定されていた仕様がなくなって、まとめて打てるようになった部分は地味ながら個人的に超好評価したい。
 ※が、未確定文字がある時に記号キーが全角大小変換キーに化けてしまうため打てないのが非常にマイナス。

総じて多機能になったもののユーザーライクから遠のいてしまったという印象です。機能が多ければ多いほど自分の使い勝手に合わせられる仕組みは必要なはずですが…(´・ω・`)

でも良い点もかなりいっぱいあるので今のところは快適です。少なくとも文字入力時に感じるストレスは減ったと思います。

そんな感じ。

McAfee Internet Security 2014 - free license for 6 months


1. Go to Promo  and then registration McAfee and click Create your account (Create Your Account).
2. Fill the form with your data, and then click I Agree.
[​IMG] 
3. Check your email and confirm by clicking on the activation link in the email.
4. Press the red button Get My Trial.
[​IMG]

【号外】154氏、Xperia Z2からPOBox Plusを移植

大感謝m(_ _)m

--------------- >>545 ---------------
SO-03F_17.1.B.0.318からPOBox Plus 1.1.A.1.8を移植しました。

API15までのインストールに対応と、xhdpi端末へ画像を最適化しています。
キセカエと使い方ガイドが表示されない仕様も修正してあります。
もっともAndroid4.4未満ではPlayストアからテーマがインストールできませんが。

ソニーストックROM用
https://www.mediafire.com/?wjcsuy9dt8jum5w

カスタムROM用
https://www.mediafire.com/?gd7xx3z7xqcceo1

--------------- ここまで ---------------


GXに入れてみました。CMなのでカスタムROM用をTWRPから入れたらok.
というか「カスタムROM用」をDLすると「POBoxPlus_1.1.A.1.8_nonSony.zip」って名前なのでXperia以外でも使えるんじゃないかな?(APIレベル15以上?までかな)
CMとXperiaって関係ないはずですし。よくわからないけど…。


これはZにも入れちゃおうかな…。

そんな感じ。

【追記】
Zに入れちゃいました。ストック用焼くだけでおk


Ashampoo Gift

Most of the Ashampoo 2013 Products can be downloaded for free from the link below.If anyone want to use full version without cracks,try 'em 

【HOME】Popup Widget 2でGoogle Now Ringを作ってみた

その他のものも。


まずナビゲーションバーを作ります。だって隠してるもん(笑)
これなら背景透過も余裕(当たり前)。


続いてGoogleのアシスト起動を作ります。アイコン部分のレイヤーの「Module OnTap」はもちろん「Google」で。
そしてこのZooperをポップアップウィジェットに登録して、ナビバーのホームボタン部分の「Module OnTap」に指定します。

アニメは「ポップアップ」でok,スライドインはしません。


こうなりました。
スライドインよりポップアップのほうがそれっぽかった。
ホーム画面に使っているZooperスキンはこちら↓

Fuschia Android Homescreen by Bakari - MyColorscreen


オマケ:旧Chrome App Launcherのフキダシ風フォルダも作ってみた↓


画像用意する必要がなく(アプリアイコン画像のみ必要)、矩形に影つけて線引いてテキスト載せるだけの簡単な作業でok.


そんな感じ!

Glary Utilities 5.X PRO Serial Key

Glary Utilities 5.X 
Glarysoft’s Glary Utilities is one of the most consistently popular and most frequently recommended system utilities, and why not? It bundles some of the most useful Windows-related tools in one free download. It scans and cleans your PC, cleaning temporary files, removing junk files, fixing broken shortcuts, and resolving a wide range of issues, both major and minor, that most Windows users will have no trouble recognizing. You can configure its One-Click Maintenance option to run just those processes you want with a single click, making regular maintenance just too easy for excuses. You can run any of its many tools individually, too.
How to Activate ?
  1. Install Glary Utilities latest free version
  2. Click PRO button in the status bar
  3. Enter the serial key given below
  4. Click Activate Now
  5. Done :)

Serial Key
6DDE-BEA7-D7B6-78AA

Leawo iOS Data Recovery 2.0 Serial Key

Leawo iOS Data Recovery 2.0
Leawo iOS Data Recovery is the comprehensive iOS data recovery software that can recover deleted, formatted and damaged camera roll photos and videos, photo stream photos, photo library images, contacts, call history, text messages, message attachments and many more data files from your iPhone, iPad or iPod touch. This iPhone data recovery fully supports iPhone 5, iPad 4, iPad mini, iPod touch 5 and many other Apple devices. It supports many kinds of data types and formats output by two optional recovery modes. Using the first mode “Recover from iOS device”, you can achieve iPhone data recovery, iPad data recovery and iPod touch data recovery by directly scanning and analyzing the device even when you have no backups. When your device is broken or lost, the program can also help you recover by extracting previous iTunes backups using the second recovery mode.
How to Activate ?
  1. Install Leawo iOS Data Recovery trial
  2. Open Leawo iOS Data Recovery
  3. Enter the key given below
  4. Click Register
  5. Done :)
Serial Key
WDTGW_IDRW5_XHXHC_FMTV3_TIPRD
Screenshots

How to Recover Your Windows Product Key

Losing your product key is something that happens to the best of us, especially when you’re as accident-prone as I am and misplace the box your Windows CD came in. Many people think about calling Microsoft tech support to resolve this issue, only to realize that they’re hitting a brick wall and wasting time. Instead of ruffling through tons of different CD/DVD cases you’ve kept over the years, you might decide to purchase a new product key or an entirely new license of Windows. Don’t make that mistake and keep that debit card in your wallet! You can use the registry to fetch the product key for your particular Windows license only if you use an older version of Windows, but Vista/7 need another procedure.
Up until Windows XP, the product key was always stored in the registry, within the HKEY_LOCAL_MACHINE key, under the “ProductID” key in “Windows” under “SOFTWARE”, making the path something like: HKEY_LOCAL_MACHINE\SOFTWARE\Windows\ProductID. Unfortunately, that’s not the case since Windows Vista. It seems that Microsoft wanted to make it difficult for you to find your product key, so that you end up buying another license when you lose one. You don’t have to do this if you use Magic JellyBean KeyFinder. Although it sounds like something fishy, it is a legitimate application that scans your Windows installation for your product key.
Oh, and here’s the other thing: The Windows “ProductID” doesn’t show the key anymore, but shows a special ID to help Microsoft identify and distinguish between one Windows installation and another. This is used to prevent two Windows installations from using Windows Update, since it’s against the company’s policy to use one Windows installation on more than one computer.
First of all, download KeyFinder’s ZIP file from this link. Open the ZIP file and extract it to a folder named in a way that you’ll remember in your local drive or on your desktop. Within the folder, you’ll find a file called “KeyFinder.exe”. Double-click it and you’ll find a screen that looks like this:
keyfinder-main-window
As you can see, you can also recover other product keys for anything else you install on your computer, depending on whether they have a key or whether they store their keys in a central location. Some applications store their keys in a file within their respective directories. For this, you’d have to do a little more investigation.
If manual searching doesn’t work, you can always find your product key with handy little applications like the Magic JellyBean Keyfinder. The alternative, in case Keyfinder doesn’t do anything for you, is Belarc Advisor, an application that gives you a full audit of your computer but also includes the product key. If everything else fails, you could always try your luck with Microsoft and give them a phone call for a replacement product key. It’s probably going to take a long time, but with luck, you’ll resolve your problem as quickly as possible.
As a habit, it is always good to backup your license keys when you first got your hand on the CD/DVD. You can easily take a photo of the license key with your mobile phone and upload the pic to your Dropbox, or Google+ account, so that when you need it, you know where to look for it.


BS. Player 2.67 PRO Serial Keys


BS. Player
BS.Player  is used by more than 70 million multi media users throughout the world and it has been translated into more than 90 languages worldwide. All downloaded versions of our FREE version exceed the sum of all downloads of competitive media players and payable DivX or DVD players. Because it does not use much of the CPU processing resources for multimedia playback it is suitable for all those who use slightly less capable computers. Now, you can finally enjoy the playback of HD DVD and AVCHD movies of the highest quality with minimal system requirements. BS.Player can playback any YouTube movie directly from the internet and save it to local disk.
How to Activate ?
  1. Install latest pro trial version of BS.Player (link given below)
  2. Run BS Player as administrator
  3. After opening BS.Player it will ask you for registration
  4. Enter any code given below,also enter your name
  5. Done :) You got BS.Player PRO for lifetime

Registration Codes
2992A28457A91AE991C18DC17DC60CD135BFB1DA2029
2992A28457A9B73DAE612A34426DA1050A1FB1DA2029
2992A28457A986BC6E7439CE360B9084CA0AB1DA2029
2992A28457A94AD51AB3A787F2805CEDBECDB1DA2029
2992A28457A9820ECACA852E5FF494366EB4B1DA2029
Screenshots


Downloads